Unit 03 - Atomic Theory and Structure
Part 01 - The Origins of Atomic Theory
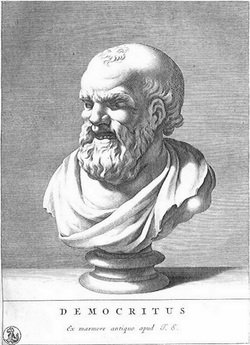
Atomic theory predates most of modern science, having originated in Ancient Greece around the year 400 BC. Commonly, the development of the atom as the fundamental particle of all matter is attributed to Democritus (and his mentor Leucippus). Democritus and Leucippus reasoned that matter could not be infinitely divisible. In other words, if a piece of matter (such as a rock) is broken down, it will eventually reach a point where the particles that it is composed of cannot be broken down any further. These tiny, indivisible, fundamental pieces of matter became referred to by the Greek word "atomos" which means "indivisible." Democritus and Leucippus believed that there were an infinite variety of atoms, each with properties that resembled the matter that they made up. They believed, for example, that Iron atoms were hard, solids with hooks that helped lock the atoms together to form a solid, while water atoms were smooth and slippery, causing them to be a liquid and the sharp, pointy nature of salt atoms was responsible for their taste. Additionally, Democritus and Leucippus believed that atoms were constantly in motion and that between the atoms that made up matter, there was empty space. It turns out, that considering their time and limited access to scientific tools, the hypotheses of Democritus and Leucippus were quite profound. Unfortunately, they were incapable of testing them scientifically, so they remained purely philosophical in nature for about two thousand years. While many of their postulates have since been disproved, a couple of them actually turned out to be correct, and the rest formed the foundation for the modern scientific exploration into atoms.
|
Investigate - What's In Matter?
How good a Greecian philosopher are you? The lab to the right was performed in class to introduce to the unit on atomic theory. |
| ||
Enter John Dalton. Dalton was an English chemist and physicist who is most widely known for his work with atoms and gases (in fact, it may be more accurate to say that his conclusions about atoms were a result of his work with gases). Around 1800 AD, (over 2000 years after Democritus and Leucippus!) John Dalton, expanded on the work of the early Greeks by postulating the following about atoms:
Based on these postulates, Dalton's visualization of the atom was limited to imaging them as tiny, solid spheres as we see in the model to the right. |

John Dalton's "Billiard Ball" model of the atom. Remember, of course that all of these models are just that; they are models. The atom is of course MUCH smaller (beyond microscopic!) and less "perfect" than these images will look, but they serve the purpose of providing an example of how different scientists have visualized the atom over time.
|
|
Interactive Notebook Pg. 12 - Early Atomic Theory
Use the video to the right to complete Page 12 of your notebook on Early Atomic Theories. How did your answers to the Conclude section of the What's In Matter Lab relate to the postulates of Democritus and Dalton? |
|
Part 02 - Things Get Electric
Around the mid 1800s, William Crookes created a partially evacuated glass tube that had metal ends called electrodes. (An electrode is an electrical conductor.) A high voltage, electric current could be passed through the electrodes of the glass tube causing the end of the tube opposite of the cathode to glow. A phosphorescent screen was placed in the tube and suddenly a ray could be seen emanating form the cathode and terminating at the anode. These rays became known as cathode rays because they traveled in straight lines from the cathode of the tube to the anode and the partially evacuated glass tube that Crookes had created became known as a cathode ray tube. You can see in the image below, a picture of a cathode ray tube. The anode is the cross-
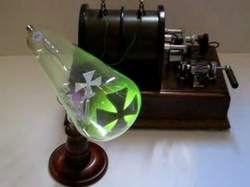
shaped piece of metal and the cathode is the metal piece at the end of the tube in the background. As the cathode ray travels from the cathode to the anode, some of the ray shoots past the anode and hits the glass, making it glow. Even more interesting though, in 1904,J.J. Thomson discovered that the cathode rays found in cathode ray tubes could be deflected by an electromagnetic field. When an electrically charged field was applied to the tube, the cathode ray would repel away from the negative side of the field and toward the positive side. This was a huge breakthrough for particle physics! See, physicists had known for a long time that there were positively and negatively charged particles and that like-charged particles would repel one another while oppositely-charged particles would attract toward one another. What they did not know however, was that atoms contained these particles! The fact that the tube was evacuated is suddenly very important. A vacuum tube is a glass tube in which all of the air inside has been removed. This means that the tube contains nothing but empty space. This is a bit of a strange concept to wrap your head around, but do your best. That means that the only matter, the only thing that contains atoms, in the tube is now the metal anode and the metal cathode. If we suppose that the cathode rays are actually made up of tiny particles of matter (which makes sense since they don't appear to act or look like light) then we might conclude that the cathode rays might be made of atoms (or some particle of matter that's moving from the cathode to the anode). However, if the cathode ray was composed of atoms, then we would expect the mass of the cathode to decrease over time as the particles were transferred over to the anode, but it doesn't. J.J. Thomson concluded that the cathode rays must be composed of subatomic particles being shot at high speeds out of the atoms in the cathode and into the anode and because these particles were attracted to positive electric fields and repelled from negative ones, they must have a negative charge. BUT atoms are negative; Thomson knew for a fact that they were neutrally charged. So he re-imagined the atom as a "sea of positive charge" (unlike Dalton's hard sphere) with a lot of smaller, negatively charged particles floating in it. These particles, although Thomson hadn't named them yet, are known as electrons. The model became known as Thomson's plum pudding model. Now that is a LOT of information, so really let that settle in before you attempt to move on. The Thomson cathode ray tube experiment is a classic! You can check out a video of the experiment below as well as an image of Thomson's atomic model (on the right).
|
Discovery of the Electron
We watched the video to the right in class and used it to complete Pg. 13 of the Interactive Notebook on the Discovery of the Electron. Our video for Page 13 of the Interactive Notebook will be listed below as well. |
|
|
The video above shows a scientist recreating J.J. Thomson's cathode ray tube experiment. After reading the description and watching the video, you should be able to describe what J.J. Thomson did, what he concluded from his experiment, and how it caused the model of the atom to change. Having trouble with this difficult concept still? Try watching the following animation:
Questions to Check for Understanding:
|

J.J. Thomson's "Plum Pudding" model of the atom. The large sphere (that looks like Dalton's model) has a positive charge with small, negatively charged particles embedded in it.
Tired and in need of a break yet? Relax and make some plum pudding of your own with the following recipe! (Click on image for link)

|
|
Interactive Notebook Pg. 13 - Discovery of the Electron
Use the video to the right to complete Page 13 of your notebook on the Discovery of the Electron. Make sure that you understand WHY J.J. Thomson's experiment influenced the atomic model. Also consider which of Dalton's postulates were disproved by the results of this experiment. |
|
Part 03 - Atoms: They're Mostly Empty, and So Are You!!!
|
Investigate - Peeking Inside the Atom
The lab investigation to the right was performed in class as a model of the Rutherford Gold Foil Experiment (explained below). The use of indirect observations are frequently used in science (and especially in the evolution of atomic theory). How did your results compare to Rutherford's? |
| ||
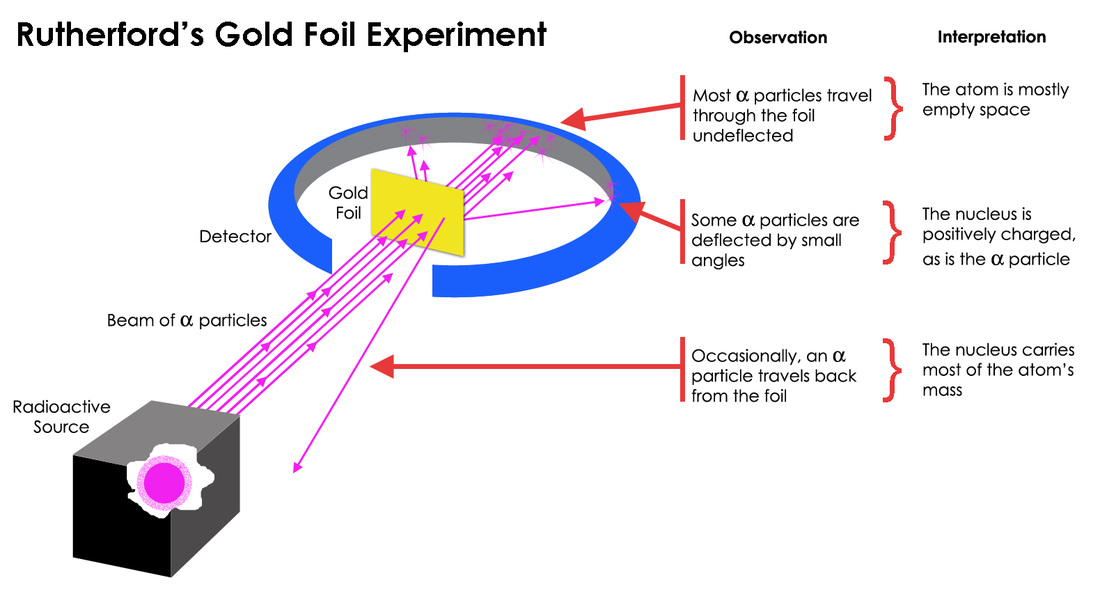
Like all good scientific experiments, J.J. Thomson's Cathode Ray Tube experiment gave us more questions than it did answers. Ernest Rutherford was skeptical of Thomson's Plum Pudding model of the atom. He reasoned that if the negative charges were floating in a sea of positive charge, that firing small, heavy masses of positive charge (known as alpha particles) through a sheet of gold foil would result in the alpha particles passing straight through the foil. This was because the alpha particles were heavy enough to resist deflection from the spread out positive charge found in the Plum Pudding model. So Rutherford did just that. (Or rather, I should say that his students, Hans Geiger and Ernest Marsden, did that. Rutherford simply analyzed their data, but still gets all the credit! Not fair huh?). So Geiger and Marsden set up a very thin sheet of gold foil in the middle of a ring made of Zinc Sulfide that

|
would light up whenever it was struck by alpha particles. (See the picture to the left.) They then directed a beam of alpha particles at a slit through the detection screen and at the thin sheet of gold foil. While most of the particles passed straight through the gold foil, as expected, a notable number of particles were deflected, several even bouncing almost straight back! Rutherford said of the phenomenon, "It was quite the most incredible event that has ever happened to me in my life. It was almost as incredible as if you fired a 15-inch shell at a piece of tissue paper and it came back and hit you." (See Below)
|
|
But what did this mean? Rutherford concluded that in fact, rather than the atom being mostly a sea of positive charge, most of its mass was actually concentrated in a small nucleus at the center (see the image to the right). This small mass of positive charge would deflect alpha particles when struck. So what about the electrons (not shown in the image to the right because they are too small)? Rutherford believed that they moved around the nucleus at high speeds but interacted very little with the alpha particles because of their extremely small size and mass. So what else occupies that space where the electrons are flying around at really high speeds? Well, in short...nothing. In fact, over 99.9999999% of an atom's volume is actually just empty space. From these conclusions, Rutherford created a new model of the atom that had a small, concentrated mass of nuclear charge in the middle, which was surrounded by a vast volume of empty space that had tiny, high speed, negatively charged particles moving quickly through it (as seen below).
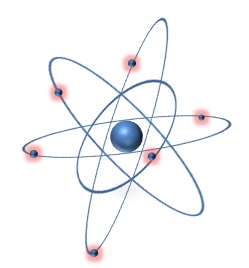
Ernest Rutherford's model of the atom. Note that in this image, the positive charge is concentrated in a small nucleus at the middle which is surrounded by small, negatively charged electrons moving in orbits around it.
|
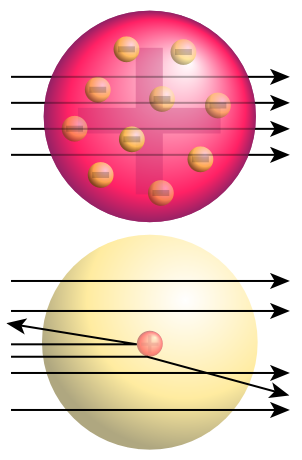
The above image shows the expected (top) results of the Rutherford Gold Foil experiment (if Thomson's model were correct) and the actual (bottom) results. Note that in the image at the top, the arrows show how the alpha particles would pass freely through the "sea" of positive charge without any significant deflection. This is because the positive charge in Thomson's model was distributed throughout a large volume so it wasn't concentrated enough to deflect the positively charged alpha particles as they passed through the atom. In reality though, many of the particles did deflect. This occurs, Rutherford concluded, because instead of the positive charge being distributed throughout a large "sea," it is instead concentrated in a small mass at the center of the atom. This explains two different things: 1. Most of the alpha particles pass straight through the atom because it is largely empty space. In the bottom image above, the circle around the nucleus is only showing you the size of the atom; the space is not filled with anything other than a few VERY tiny electrons, and 2. Several of the alpha particles deflected significantly because they struck the concentrated positive charge in the center, which did interact with the alpha particles.
|
|
Interactive Notebook Pg. 14 - Discovery of the Nucleus
Use the video to the right to complete Page 14 of your Interactive Notebook on Geiger and Marsden's gold foil experiment and how it led to the discovery of the nucleus. |
|
Part 04 - Energy Matters!
|
Investigate - Quantum Particles
Max Planck and Albert Einstein discovered, in the early 20th century, that light (and all electromagnetic radiation) traveled in discrete packets of energy called quanta. In the lab investigation to the left, we simulated the discovery of quantized light by determining the number of particles in a container by examining incremental masses. | ||
Electromagnetic Radiation
Now we have to take a little "break" from atomic theory to review electromagnetic radiation. You'll recall from many years ago (all the way back to middle school!) that electromagnetic radiation is a type of energy that travels in waves. Electromagnetic radiation includes a lot of different types of waves, all of which can be found on the electromagnetic spectrum seen below. The electromagnetic spectrum is the entire range of possible wavelengths and frequencies of electromagnetic radiation
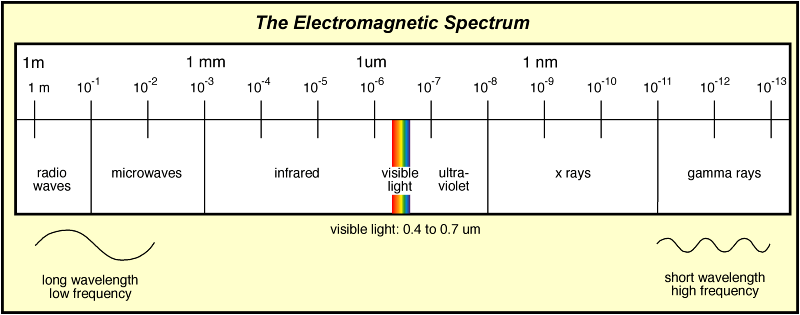

In addition to showing the types of radiation, the spectrum also identifies the wavelengths and frequencies associated with the different forms of electromagnetic radiation. You may also remember that wavelength is the distance between two adjacent crests (or peaks) on a wave. Because wavelength is a distance, it uses the meter as a unit. However, as wavelengths are often very smally, you will commonly see wavelength expressed in nanometers (nm) which are 10^-9 m.) Frequency is the number of cycles or oscillations that a wave can make in a given period of time (for example, one second). The unit for frequency is 1/seconds which is also called Hertz (Hz). As you can imagine, the longer a wavelength is, the fewer number of oscillations it will be able to make in a given period of time (shown on the right) meaning that wavelength and frequency are inversely proportional with one another. Additionally, all electromagnetic radiation travels at the same speed, 3.00 x 10^8 m/s (in a vacuum). We can use the speed of electromagnetic waves and the inversely proportional relationship between wavelength and frequency to establish the following equation:
c = λ * f
where c = the speed of an electromagnetic wave, λ is the wavelength of the wave (in m) and f is the frequency of the wave (in Hz).
c = λ * f
where c = the speed of an electromagnetic wave, λ is the wavelength of the wave (in m) and f is the frequency of the wave (in Hz).
|
The Wave Particle Duality of Light
Now, believe it or not, it was not always accepted that light was a wave. In fact, the debate spanned a couple of centuries before it was finally resolved by Thomas Young's famous Double Slit experiment. In this experiment, Young passed light through two tiny slits on a screen, and rather than seeing two distinct bands on the other side (what we would expect to see if light was a particle), he saw an interference pattern that indicated that as light passed through the slits, the two bands of light interfered with each other and created a pattern of constructive and destructive interference - something that would only be possible if light were indeed a wave. Problem solved! Right? |
|
The Dynamic Duo
Or perhaps it would be more appropriate to call them the "Quantum" Duo. Either way, it is difficult to explain just how important Max Planck and Albert Einstein were to 20th century physics. Between them, they are responsible for Quantum Mechanics (Planck) and Relativity (Einstein) which are the 2 most paradigm-shifting, field changing theories of the 1900s (and earned each of them a Nobel Prize for their respective work). Planck's development of quantum mechanics began in 1900 when hypothesized that electromagnetic radiation is quantized (meaning that it comes in discrete amounts). Specifically Planck suggested that electromagnetic radiation (including light) existed in quanta and each quantum represented a discrete quantity of energy that was proportional to the frequency of the radiation. Mathematically, this is stated as: E ∝ f (where the ∝ symbol means "directly proportional to"). Planck's work eventually resulted in a constant, that when multiplied by the frequency of an electromagnetic wave would yield the energy of that wave. This constant is known as Planck's Constant (h) and is equal to 6.626 × 10^-34 J*s. The equation for this relationship is shown below:
E = h * f
E = h * f
Physics was becoming fairly divided at this point in history, and Planck had many opponents to this idea. Fortunately though, among his few believers, was Albert Einstein. Einstein took Planck's idea and made it sound even more unlikely by suggesting that electromagnetic radiation is actually made up of small, massless particles (which we now call photons). Of course, Einstein also understood that electromagnetic radiation exhibited many wave-like properties. How could this be? Scientists were forced to conclude that photons actually had a wave-particle duality meaning that they simultaneously exhibited some properties of waves and some properties of particles.
|
|
Interactive Notebook Pg. 15 - Electromagnetic Radiation
Use the video to the left to complete Page 15 of your Interactive Notebook about Electromagnetic Radiation. Keep this information in mind as it will be very helpful when we get to the Bohr model of the atom (a little further down). |

Subatomic Particles
Following the discovery of the nucleus, scientists began searching for the positive particle that must have made it up. And indeed Ernest Rutherford, in 1920, did manage to discover a small particle with a positive charge that was located in the nucleus of the atom. Of particular importance was the discovery that the number of these particles was VERY important to the identity of the atom. You know this particle as the proton. And the number of protons in an atom of an element is unique to that number. For example, any atom in the universe with 3 protons is a Lithium atom. In fact, the number of protons in the nucleus of an atom is so important that we refer to it as the Atomic Number which is represented by the letter Z. The proton was kind of a big deal... However, imagine his surprise when he isolated the proton, only to find that with it, there existed something else in the nucleus of the atom! There were several ideas about what this other substance was (one of which hypothesized that it was gamma radiation). But in 1932, James Chadwick provided evidence to support the hypothesis that not only was this substance a particle (of very similar size to the proton) but also that it was neutrally charged. He called this particle the neutron. That brings our total of subatomic particles at this point to three - the proton, neutron and the electron. (As it turns out, we now know that protons and neutrons are made up of even smaller particles called quarks. You'll notice that the image above shows the different subatomic particles within an atom and includes quarks as well.) Just how many of each of these particles are in an atom though? You already know that the number of protons is determined by the element of the atom and is therefore, equal to the atomic number (which can be found on the periodic table). Since each proton has a positive charge, a neutral atom will need just as many negative charges to cancel them out. Therefore, the number of electrons in a neutral atom is equal to the number of protons. Lastly, the number of neutrons within the nucleus of an atom is highly variable, even within the same element, and will depend on the overall mass of the atom. Each proton and each neutron has a mass of 1 amu (atomic mass unit) and since the mass of electrons is practically negligible, we can calculate the atomic mass number of an atom (in amu) by adding together the number of protons and neutrons. That also means, that the number of neutrons in an atom is equal to the atomic mass number minus the number of protons.
Following the discovery of the nucleus, scientists began searching for the positive particle that must have made it up. And indeed Ernest Rutherford, in 1920, did manage to discover a small particle with a positive charge that was located in the nucleus of the atom. Of particular importance was the discovery that the number of these particles was VERY important to the identity of the atom. You know this particle as the proton. And the number of protons in an atom of an element is unique to that number. For example, any atom in the universe with 3 protons is a Lithium atom. In fact, the number of protons in the nucleus of an atom is so important that we refer to it as the Atomic Number which is represented by the letter Z. The proton was kind of a big deal... However, imagine his surprise when he isolated the proton, only to find that with it, there existed something else in the nucleus of the atom! There were several ideas about what this other substance was (one of which hypothesized that it was gamma radiation). But in 1932, James Chadwick provided evidence to support the hypothesis that not only was this substance a particle (of very similar size to the proton) but also that it was neutrally charged. He called this particle the neutron. That brings our total of subatomic particles at this point to three - the proton, neutron and the electron. (As it turns out, we now know that protons and neutrons are made up of even smaller particles called quarks. You'll notice that the image above shows the different subatomic particles within an atom and includes quarks as well.) Just how many of each of these particles are in an atom though? You already know that the number of protons is determined by the element of the atom and is therefore, equal to the atomic number (which can be found on the periodic table). Since each proton has a positive charge, a neutral atom will need just as many negative charges to cancel them out. Therefore, the number of electrons in a neutral atom is equal to the number of protons. Lastly, the number of neutrons within the nucleus of an atom is highly variable, even within the same element, and will depend on the overall mass of the atom. Each proton and each neutron has a mass of 1 amu (atomic mass unit) and since the mass of electrons is practically negligible, we can calculate the atomic mass number of an atom (in amu) by adding together the number of protons and neutrons. That also means, that the number of neutrons in an atom is equal to the atomic mass number minus the number of protons.
|
|
Interactive Notebook Pg. 16 - Subatomic Particles
Use the video to the left to complete Page 16 of your Interactive Notebook about the different types of subatomic particles that make up atoms. |
|
Investigate - Average Mass of M&Mium
The laboratory investigation to the left was performed in class to identify the relationship between the mass of different isotopes (type of M&Ms), the abundance of each isotope (the percent of M&Ms of each type) and the average atomic mass (average mass of a single M&M from the sample) | ||

Isotopes
Contrary to John Dalton's third postulate, not all atoms of the same element are identical. In fact atoms of the same element may differ by their number of neutrons (and thus their atomic masses). We call these different forms of an element isotopes. Isotopes are identified by their mass number. For example, a Carbon atom with a mass of 14 amu is referred to as Carbon 14. Additionally, we can denote an isotope by writing an isotopic notation. In isotopic notation, the mass of an isotope is written to the top left of the element symbol and the atomic number is written to the bottom left. There is an example of this format to the right. There are often several different isotopes for any given element. Below are examples of isotopic notations for three different isotopes of Helium. Notice that while the atomic mass changes, the atomic number does not.
Contrary to John Dalton's third postulate, not all atoms of the same element are identical. In fact atoms of the same element may differ by their number of neutrons (and thus their atomic masses). We call these different forms of an element isotopes. Isotopes are identified by their mass number. For example, a Carbon atom with a mass of 14 amu is referred to as Carbon 14. Additionally, we can denote an isotope by writing an isotopic notation. In isotopic notation, the mass of an isotope is written to the top left of the element symbol and the atomic number is written to the bottom left. There is an example of this format to the right. There are often several different isotopes for any given element. Below are examples of isotopic notations for three different isotopes of Helium. Notice that while the atomic mass changes, the atomic number does not.

Average Atomic Mass
Because there are several different isotopes of most atoms present in nature, it is impossible to identify an exact atomic mass for any given sample of element (after all, in a sample of Carbon, some of the atoms are Carbon 14 while others are Carbon 12). Therefore, we can use the average atomic mass instead of a specific mass number. The average atomic mass is a weighted average of all of the different isotopes of an element present in a sample based on their relative abundances. We can calculate the average atomic mass using the following formula:
Because there are several different isotopes of most atoms present in nature, it is impossible to identify an exact atomic mass for any given sample of element (after all, in a sample of Carbon, some of the atoms are Carbon 14 while others are Carbon 12). Therefore, we can use the average atomic mass instead of a specific mass number. The average atomic mass is a weighted average of all of the different isotopes of an element present in a sample based on their relative abundances. We can calculate the average atomic mass using the following formula:

|
Interactive Notebook Pg. 17 - Isotopes and Average Atomic Mass
Use the video at the right to complete Pg. 17 of your Interactive Notebook about Isotopes and calculating Average Atomic Mass |
|
The Origin of the Bohr Model
But how exactly does this information about electromagnetic radiation help us develop a new model of the atom? There is actually a quite fascinating answer to this question! It had been known for some time that atoms can actually emit light. You've seen this many times without realizing what was actually responsible for it. (This is why metals begin to glow orange or red when they are heated to high temperatures.) But late in the 19th century, scientists discovered something very interesting - atoms only emitted light of VERY specific frequencies and wavelengths! This was specifically discovered with Hydrogen atoms. An excited atom will emit light in a very specific pattern called an emission spectrum. The emission spectrum for Hydrogen is shown below. Each band represents a wavelength of light that Hydrogen gas will release when its atoms are excited. These
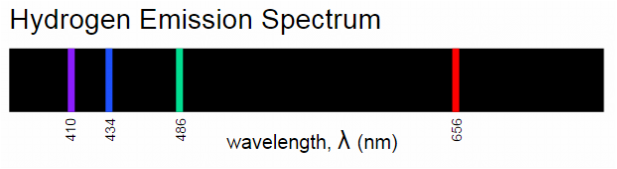
four bands of light represent Hydrogen's emission spectrum; these are the only colors of light that will be emitted by Hydrogen atoms. But why? A few scientists (including Balmer, Rydberg and Bohr) were working on interpreting this phenomenon. Niels Bohr, hypothesized that the electrons in atoms occupied specific energy levels and then higher energy levels were further away from the nucleus while lower energy level ones were closer. Bohr believed that by absorbing or releasing energy, these electrons could move up or down energy levels, respectively, but because the energy levels represented specific quantities of energy, the electrons could only absorb or release the exact amount needed to move up or down to another energy level. The energy level that the

electrons are normally found in is known as the ground state. When an atom absorbs energy (in class we did this by putting metal ion samples in a flame) the electrons (if they absorb enough energy) can jump to higher energy levels (an excited state). Of course, the electrons will eventually return to the ground state. In order to do this though, they'll need to lose all of the energy that they absorbed and this is done by emitting light. The frequency and wavelength of this light will be determined by the amount of energy being given off (this can be calculated using Planck's equation above). The image to the right shows an excited electron in the 3rd energy level returning to the second energy level. Notice that the change in energy between the 3rd and 2nd energy levels will be proportional to the frequency of the light and thus determine its color. This process of an electron being excited to a higher energy state and then emitting light energy to return to a lower energy state is known as a quantum leap.
The Bohr Model of the AtomAnd this brings us, finally, to the Bohr model of the atom, seen in the image to the right. The Bohr model resembles the Rutherford model in many ways, but the key difference is that the electrons are found in discrete energy levels around the nucleus rather than occupying random orbital paths. This idea is going to be very important to the further development of the atomic model.
|

|
|
|
Interactive Notebook Pg. 18 - The Bohr Model of the Atom
Use the video to the left to complete Page 18 of your Interactive Notebook about the Bohr atomic model. How does the Bohr atomic model compare to the Rutherford model? What problem with the Rutherford model led Niels Bohr to change it? |
|
Illustrating the Bohr Model of the Atom
Each energy level has a specific energy requirement that corresponds to a distance away from the nucleus. Notice that the first energy level is closer to the nucleus while energy levels 2 and 3 expand further and further out. An interesting thing happens when we try to start putting electrons into the Bohr model though. Even though each energy level is HUGE relative to the size of the electrons, we still are limited in the number of electrons that can go into each level. This is because the electrons begin to repel one another when they are put into the same energy level. This is a phenomenon known as electron-electron repulsion and is responsible for many of the things that we will discuss this year. So exactly how many electrons can we put in each energy level? The table to the right illustrates |
Energy Level
Energy Level 1
Energy Level 2 Energy Level 3 Energy Level 4 |
Number of Electrons
2 electrons
8 electrons 18 electrons 32 electrons |
the number of electrons that can occupy each energy level (for the first 4 energy levels). There are more than 4 energy levels, but for now, we will worry only about these energy levels. We can illustrate Bohr models of an atom by drawing a Bohr model and then filling in the nuclear charge (equal to the atomic number on the periodic table) and the electrons in their appropriate energy levels. Review the examples shown below and then try a few of your own:
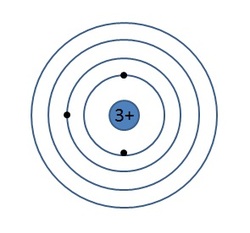
Element: Lithium
Nuclear Charge = 3+ Number of Electrons = 3 Electrons per Energy Level: 1st Energy Level - 2 2nd Energy Level - 1 3rd Energy Level - 0 4th Energy Level - 0 |

Element: Sodium
Nuclear Charge = 11+ Number of Electrons = 11 Electrons per Energy Level: 1st Energy Level - 2 2nd Energy Level - 8 3rd Energy Level - 1 4th Energy Level - 0 |
|
Bohr Model Practice Worksheet
The worksheet to the right was assigned in class to practice drawing Bohr model atoms. Notice that these elements are all found in the first 3-4 periods of the Periodic Table. You'll notice that the atom gets quite a bit more complicated once you start to add more electrons than that and the Bohr model becomes less appropriate for adequately describing larger atoms. |
| ||
Valence Electrons and Lewis Dot Structures
The electrons in the outermost energy level of an atom that participate in chemical bonding are known as valence electrons. We can determine the number of valence electrons easily for atoms of representative elements (elements in groups 1A - 8A). It is a bit more difficult to determine the number of valence electrons for transition elements (elements in groups 3-12) so we will leave them out of this discussion. For elements in groups 1A - 8A, the number of valence electrons is equal to the group number. For example, Sodium, an element in group 1A has one valence electron while Chlorine, an element in group 7A, has seven valence electrons. You might have noticed that these numbers may not consistent with the number of electrons that should be in the outermost energy level, but that's because not all of the electrons in an atom's outer shell are valence electrons. Valence electrons are only the electrons in the outer shell that participate in chemical bonding. For any atom, this number will be limited to a maximum of 8.
We can use a special notation to illustrate the number of valence electrons in an atom as well as their ability to form chemical bonds. This notation is known as a Lewis Dot Structure and it represents the valence electrons of an atom as dots arranged around the element symbol. A Lewis Dot Structure can illustrate a maximum of 8 electrons for an element since that is the maximum number of valence electrons. Additionally, these dots are written on the four sides of the element symbol and none of the dots are paired until there is at least one dot on each side. Look at the examples below that show the Lewis Dot Structures for the first twenty elements of the Periodic Table. Can you predict the structures of the missing elements?
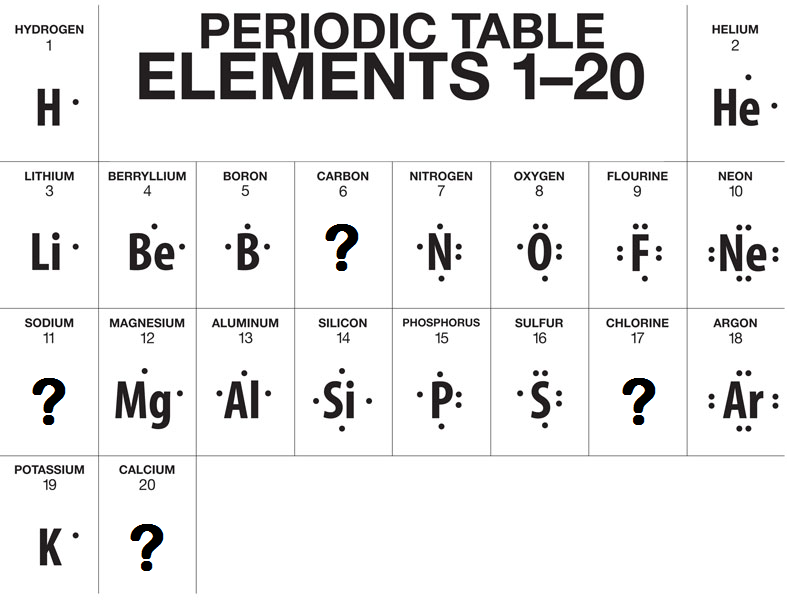
One Final Though About Lewis Structures and Valence Electrons: You may have noticed in the example Lewis Dot Structures above that the Lewis Dot Structure for Helium only has 2 electrons even though Helium is found in group 8A. Why? Helium happens to be the one exception to this rule. While the other elements in group 8A do have 8 valence electrons, Helium only has 2 electrons total, both of which are in the first energy level (which happens to also be its valence shell). Therefore, both of Helium's electrons are valence electrons but there are still only two of them. Helium is the only exception though. The rest of the elements should work just fine!
|
|
Interactive Notebook Pg. 19 - Valence Electrons and Lewis Dot Structures
Use the video to the left to complete Page 19 of your Interactive Notebook about Valence Electrons and Lewis Dot Structures. Pay careful attention to what valence electrons are and be able to differentiate valence electrons from other outer energy level electrons. Also, make sure that you understand how to draw Lewis Dot Structures as these will be vital to our understanding of Chemical Bonding later this year. |
Part 05 - The Evolution of the Quantum Model
|
The Wave-Particle Duality of the Electron
Remember when we discussed the Double Slit experiment above in Part 04? It turns out that scientists weren't quite done with this experiment. Following the exciting and perplexing discovery of the wave-particle duality of light, scientists repeated the double slit experiment with electrons which they knew to be particles. What do you think they found? You guessed it; the electrons, when shot through the double slit, created the same interference pattern that they saw with light indicating that electrons must behave like waves. But that's impossible, right?! We know electrons are particles! They have a charge! They have a mass! But as it turns out, it's true. Electrons exhibit properties of both waves and particles, just like light, and as I'm sure you can guess, that spells trouble for our neat, clean Bohr model of the atom. |
|
The Heisenberg Uncertainty Principle
So the Bohr Model is great, right? It explains many of the chemical phenomena that we have discussed in class (such as chemical bonding and why the electrons do not gradually spiral into the nucleus of the atom). Plus, it's neat and clearly illustrates the position of the electron in the atom. There's probably no good reason to change the model, right? Enter Werner Heisenberg, stage right. In 1927, just a few years after Bohr published his model, Heisenberg formulated a mathematical argument that he called the Uncertainty Principle (we now often refer to it as the Heisenberg Uncertainty Principle). Heisenberg's Uncertainty Principle stated there was a limit to the precision of our observations and measurements of the properties of particles (i.e. electrons). And that more importantly, when observing more than one property of a particle, as our knowledge of one property (for example position) of a particle becomes more precise, our knowledge of another property (for example momentum), becomes less precise.
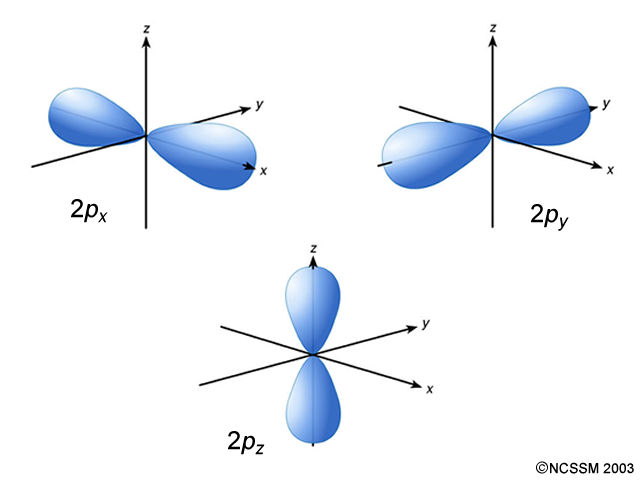
So WHERE is the Electron?As Heisenberg identified in the Uncertainty Principle, our knowledge of the exact location and angular momentum of the electron at any given point is...well...uncertain. However, imagine if instead of attempting to track the electron for long periods of time, we instead were to take a series of quick snapshots of where the electron is. Based on a large number of these images, we could predict areas where the electron is most likely to be found, right? So let's try that! To the right are five PowerPoint files. Each one takes you inside of a Carbon atom and allows you to see snapshots of the electrons as they move about the atom. For the sake of simplicity, the electrons have been grouped in pairs.
Electron Addresses Lab The lab to the right was completed in class using the 5 PowerPoint files above it to describe the shape of the s and p electron clouds of the first two energy levels. |
| ||||||||||||


|
Unit 03 Review Worksheet
The worksheet to the right was assigned in class a unit review. Use this worksheet to help you study for the upcoming Unit 03 Exam! Remember that the exam may cover topics that are not found on the worksheet so it is important that you study all of your other notes and resources as well! |
| ||
|
|
Interactive Notebook Pg. 20 - Quantum Atomic Model
Use the video to the left to complete Page 20 of your Interactive Notebook about the Quantum Atomic Model of the atom. This atomic model differs from all of its predecessors in some very critical (and weird) ways! Questions to consider: How do the wave/particle duality of the electron and the Heisenberg Uncertainty Principle contribute to the Quantum Atomic Model? Can you clearly identify all of the differences between the quantum atomic model and the preceding models of the atom? |

Electron Configurations
We can specify the number and locations of electrons within orbitals of an atom by writing electron configurations. To do this, we will write a notation like the example to the right for every orbital within an atom. To the left, we write the numerical value of the energy level (1, 2, 3, 4, 5, etc.). Next to the that we will write the letter that represents the orbital (s, p, d, or f). And finally, as a superscript above the orbital, we will write the number of electrons within that orbital type. In the example to the right, this would be the electron configuration of Hydrogen as it shows only a single electron in the 1s orbital. Electrons will always fill lower energy levels before higher ones. Generally, this means that electrons will fill 1st energy level orbitals before 2nd energy level orbitals. But there are some exceptions to this. For example, you can see in the image below (on the left) that the 3d orbital is actually a higher energy level than the 4s orbital and therefore, we will fill the 3d AFTER the 4s. The image below (on the right) is a diagram showing the order in which these orbitals will fill (through 6s).
We can specify the number and locations of electrons within orbitals of an atom by writing electron configurations. To do this, we will write a notation like the example to the right for every orbital within an atom. To the left, we write the numerical value of the energy level (1, 2, 3, 4, 5, etc.). Next to the that we will write the letter that represents the orbital (s, p, d, or f). And finally, as a superscript above the orbital, we will write the number of electrons within that orbital type. In the example to the right, this would be the electron configuration of Hydrogen as it shows only a single electron in the 1s orbital. Electrons will always fill lower energy levels before higher ones. Generally, this means that electrons will fill 1st energy level orbitals before 2nd energy level orbitals. But there are some exceptions to this. For example, you can see in the image below (on the left) that the 3d orbital is actually a higher energy level than the 4s orbital and therefore, we will fill the 3d AFTER the 4s. The image below (on the right) is a diagram showing the order in which these orbitals will fill (through 6s).

|

|
You can also use the periodic table to predict the order in which the orbitals will fill. You use this periodic table by always starting your electron configurations at the top left and moving from left to right across a period and then top to bottom. As you move across a period, you can determine the number of electrons in each block by simply counting the elements.
Below are some examples of Electron Configurations. Still confused? Check out this video about writing electron configurations and watch the video for Interactive Notebook Page 21 - Electron Configurations.
Part 06 - Beyond the Quantum Model
|
Not satisfied with where we stop in high school Chemistry? Dying to know about quarks, leptons, gauge bosons or even that crazy Higgs-boson that you keep hearing about? Or what about string theory? In the decades following where our story of the atom stopped, a significant amount of work has been done to advance the field of particle physics. The Particle Data Group at Berkeley Lab has a fantastic website with brief introductions to these concepts as well as some more information on the content covered above Just click on the image to the right to visit the website!
|

|
